Tuesday, October 11, 2011

Quick Crafts

My island was initially supposed to be 2 Ikea kitchen counters but the guy I got it from off of Craigslist put a large butcher block top on it.  This left the back of the cabinets exposed with raw edges.  I wanted to cover it with something pretty.  I chose some fabric that had the colors I wanted to incorporate in my kitchen.  I found this lovely fabric :)


So here is the before picture:


And here's the after picture:


I hemmed the edges and sewed velcro at 10 inch intervals on the back of the fabric.  Then I stapled the other velcro side to the back of the island.  I think it makes a huge difference :)  The hubby thinks it looks like something out of the 70s but I love it :)

I had some small pieces left over that I wanted to use.  I had some small canvas covered frames I got from Big Lots for $2.  They had some bland picture on them so I covered them with some left over fabric and ended up with some wall decor :)


Overall, I'm really happy with how everything turned out :)

Happy crafting everyone :)

Saturday, October 8, 2011

Yarn Wreath

It's never too early to start crafting for the holidays :)  I made this pretty yarn wreath in a few hours.  


All you need is a styrofoam ring, yarn and pompoms/felt for embellishment.  Wrap the yarn around the ring  - I went around 3 times.  Then glue on the pompoms and felt embellishments.  You can also make little felt rosettes too :)

Happy crafting :)

Taking care of butcher block

Quality products are hard to find and when you do find them you have to pay a pretty penny for them.  When I was looking for an island for my kitchen, I knew I wanted something sturdy and with a relatively large surface area AND I didn't want to pay a lot for it.  I looked online and saw lots of islands - nice granite islands - but they didn't really have the area that I wanted and they wouldn't have fit the look of my kitchen.  Then I found a 45" x 60" Ikea butcher block island that a guy was selling on Craigslist for $45!!! At the time we didn't even have the house yet but I knew I needed it.  However, I didn't really have any idea of how big it really was or how it would fit into the kitchen. When I was actually putting it together, I realized that it was actually 2 Ikea kitchen cabinet pieces with butcher block sides and a top.

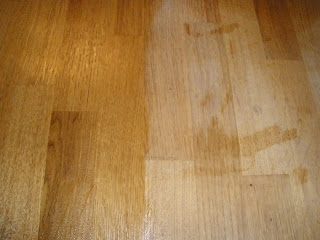
Needless to say, I have no idea how I'd function without it now.  I'd never owned real butcher block before so I did some research on how to take care of it.  You should season your butcher block at least once a month with a light coating of warmed mineral oil.  Since I didn't have any mineral oil on hand, I found that you can substitute grapeseed oil since it doesn't go rancid.  If your butcher block is new, do one coat and let it dry.  Then, repeat 5-6 times letting the coats dry each time.


On the left is the treated area and on the right is untreated.  See what a little oil can do :)

Thursday, September 29, 2011

Upcoming craft

Hopefully this weekend I'll be attempting to make fabric covered roller blinds for my craft room.  Check them out.  They look super easy and let you add a more personal touch to a room than regular blinds.  I just need to get to Home Depot to pick up another roller blind since I'm a moron and forgot an extra window.... but I do have some lovely busy fabric to use for this project.

Here's what the craft room looked like before we moved in:


Check back later to see if it was a win or a flop :)

Sunday, September 11, 2011

Welcome back :)

Hi everyone!
Sooooo much has happened in the last few months - im just starting to catch my breath!  We bought a house on July 1st, got the keys and started cleaning/priming/painting/moving on July 24th and got married on July 28th!  We survived an earthquake, a hurricane and (after the hurricane put 2 inches of water in our basement) a few more days of monsoon-like rains.... It has been a LONG few weeks but we are ok :)

Yesterday, we finished cleaning out the apartment and finally turned in the keys :)  The new house has furniture and too much junk in it already!  I finally have a big kitchen with an island and an official craft room!! And we also have a little gym in the basement with a recumbent bike, treadmill, bench press / squat area and free weights.  Time for me to get into shape :)

I decided to change my blog around a bit.  I'm hoping to focus more on cooking AND crafting.  Also check out my Zibbet store full of handmade little bits of awesomeness :)  (click the pic on the right of this post anytime) I hope everyone will enjoy the transition :)

Thanks for coming over!!

Saturday, March 12, 2011

Hi everyone!

Sorry I've been MIA.  Picked up lots of new responsibilities at work but now I get to work from home!!! I'm super happy about that since the gas prices keep going up.

Oh also - I'm engaged now!!

YAY!  He was sooo cute when he proposed - he used the cat as a conspirator :)
Sooooo we are hoping for a July wedding - nothing fancy - and then buying a house when our lease is up in September.  I'm soooo ready for a house and a real kitchen.  In anticipation of getting hitched we are stepping up our efforts to get healthy.  So I should be putting up many more recipes soon.

Also, I've always wanted to open up my own little online shop with handmade items :) So I did!

Check out my Zibbet store, I only have a few items up but they sure are cute :)  I'm working on getting some more things up there but please do take a look and buy something if you like it :)  And don't hesitate to contact me with questions or custom requests :)

Thanks for stopping by!

Saturday, January 8, 2011

Winner Winner - Chicken Dinner!

Looks like KCR wins the Bisquick Prize pack.


KCR - please email me (terrorinthekitchen (at) gmail (dot) com) before Monday with your info :)

Thanks everyone!

Tuesday, January 4, 2011

I'm Back!! PLUS a Giveaway!

We'll I'm a terrible blogger.... I don't know why I even bother... :( Sorry I've neglected you guys.

I managed to pass my classes and put in tons of (mandatory) overtime at work and still managed to keep my sanity. I'm happy to have a stable job and be able to go to school but sometimes it just gets to be a bit much.

I have a few recipes to post with lots of pics :) so hopefully people are actually still going to read this.

To make up for the lack of posts - I have a great giveaway for you!

Up for grabs is a Bisquick Gluten Free Pancake Mix set :)
It comes with a cast iron mini pancake pan, spatula, the Bisquick Gluten Free Pancake mix and a pancake batter pen.


I was tickled pink with the batter pen. You can put all the ingredients in the pen and shake it up. It was super easy to fill, shake and "write" with the batter. And best of all, you can just throw it in the dishwasher.

I've never cooked with cast iron but I followed the seasoning instructions and it turned out pretty good. The pancakes themselves were very light and the batter pen was really fun to use. I think I'm going to use it to fill mini muffin pans.


Also for whoever is still reading, you
can visit http://www.myblogspark.com/uc/main/8b49/ to download a printable coupon for $1 off Bisquick Gluten Free baking mix!

To find great recipe tips and ideas, visit www.bisquick.com/glutenfree. There, you’ll find countless gluten-free recipes for family favorites such as Gluten Free Strawberry Shortcakes and Gluten Free Pizza Crust, using Bisquick Gluten Free baking mix. Check back often! They’re adding more recipes every day! All you have to do to enter is leave a comment on this post :) Let me know what your favorite type of pancake is or what add-ons you like (chocolate chips, blueberries, bananas, whipped cream). I'll choose a winner on Saturday night. I'll need the winners info by Monday 1/10 otherwise another winner will be chosen.

Good luck!


Disclosure - MyBlogSpark provided me with the same prize pack that is being given away for free.  All opinions are my own.

Monday, August 23, 2010

Deb's Dill Dip

My BF's mom makes this great dill dip for family get-togethers. She kindly shared the recipe with me so I could make it for her son whenever he wants it. Here it is right from her recipe card... my changes are in red :)

Deb's Dill Dip
2/3 cup mayo - I used Kraft Olive Oil Mayo
2.3 cup sour cream
1 Tbsp dill weed
1 Tbsp parsley flakes
1 Tbsp minced onion flakes - I used a light sprinkle of onion powder to taste
1/2 tsp seasoned salt

Combine all ingredients and refrigerate overnight. Serve with rye and or pumpernickel breads.

Deb's additional variations:
Use an 8oz (1 cup) container of sour cream then use the empty sour cream container to measure an equal amount (1 cup) of mayo. Since this is 50% more mayo and sour cream, increase the other herbs and onions to 1 1/2 Tbsps and increase the salt to 3/4 tsp.

I made this and let it sit over night in the fridge. The BF loved it the next day, even with my changes :)

Enjoy!

Sunday, August 22, 2010

Stuff to try out....

Here's some stuff I want to try soon. I hope school isn't going to tie me up as much as it did the last few months....


If you try any of these, let me know how they turn out :)